Our beginner’s guide (constantly updated)
Quick access to
- Why Raspberry Pi?
- Video recording based on Raspberry Pi: overview
- Video recording based on Raspberry Pi: basic equipment
- Video recording based on Raspberry Pi: OS configuration
- Video recording based on Raspberry Pi: video recording
- Video recording based on Raspberry Pi: video analysis
- Video recording based on Raspberry Pi: remote access
- Video recording based on Raspberry Pi: main storage
- Video recording based on Raspberry Pi: cases and monitors
- Video recording based on Raspberry Pi: conclusion
Raspberry Pi Foundation single-board computers have quietly become one of the most powerful tools in modern biological research. Cheap, compact, programmable, and endlessly adaptable, Raspberry Pi systems bridge the gap between classic laboratory setups and fully custom, open-source experimental platforms.
Why Raspberry Pi?
Raspberry Pi allows researchers to build exactly the experiment they need, rather than adapting questions to commercial hardware. With native support for cameras, sensors, GPIO control, networking, and Python-based automation, a single board can replace multiple dedicated devices—at a fraction of the cost.
Key advantages:
- Low cost and scalability
- Precise control
- High-quality video
- Remote access via SSH, VNC, Wi-Fi/Ethernet for unattended experiments
- Open-source ecosystem
- Automation of experimental procedures
Review: Broad-scale applications of the Raspberry Pi: A review and guide for biologists (Methods in Ecology and Evolution)
Video recording based on Raspberry Pi: overview
Raspberry Pi–based systems provide a flexible, low-cost, and fully customisable solution for video recording in behavioural and orientation experiments. Thanks to their small size, low power consumption, and extensive open-source ecosystem, Raspberry Pi (RPi) computers can be easily integrated into laboratory and field setups where conventional cameras or commercial tracking systems are impractical, too expensive, or insufficiently adaptable.
An RPi combined with the official Raspberry Pi Camera Module allows high-resolution video recording with precise control over frame rate, exposure, gain, and recording schedules. Using Python scripts, recordings can be triggered automatically, synchronised with experimental events (e.g. light changes, magnetic field manipulations, or stimulus presentation), and saved with structured metadata. This makes RPi-based systems particularly well suited for long-term experiments, high-throughput behavioural assays, and remote or unattended recording.
One major advantage of RPi systems is their modularity. Cameras, illumination sources (IR, visible), environmental sensors, and external devices (e.g. LEDs, motors, power supplies, magnetic coils) can be controlled directly via the GPIO pins. Multiple Raspberry Pi units can be networked to run parallel experiments, enabling scalable and reproducible data collection across experimental replicates.
From an open-science perspective, RPi-based video recording systems are fully transparent and reproducible. Hardware components are inexpensive and widely available, while software can be shared as documented scripts rather than black-box executables. This facilitates replication of experimental setups across laboratories and allows fine-grained adaptation to species-specific or question-specific requirements, such as nocturnal recording, low-light sensitivity, or integration with custom behavioural arenas.
In our work, Raspberry Pi–based video systems form the backbone of open, customisable pipelines for behavioural experiments, from raw video acquisition to automated analysis using open-source tracking and pose-estimation tools. This approach combines affordability with experimental precision and aligns with best practices in reproducible and accessible behavioural research.

Video recording based on Raspberry Pi: basic equipment
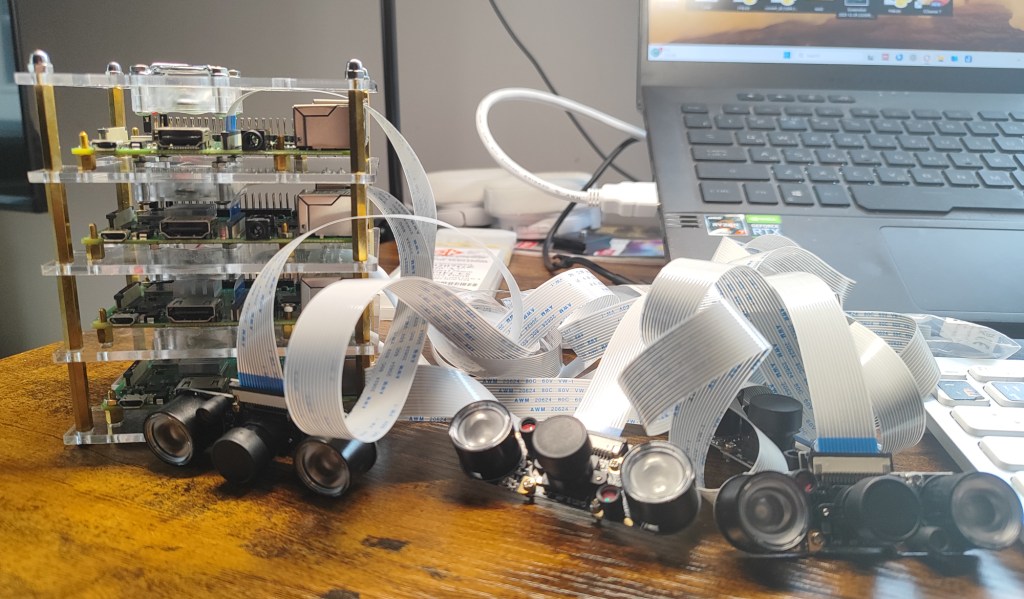
1. Raspberry Pi
There is now a wide range of Raspberry Pi boards available, from the compact Raspberry Pi Zero to standard boards (Raspberry Pi 3, 4, and 5) and Compute Modules. This diversity allows users to choose the platform that best matches their experimental requirements, technical complexity, and budget.
Differences between Raspberry Pi versions for video recording (click to expand)
Best for: simple, low-cost, multi-camera setups
- ✅ Very low cost and power consumption
- ✅ Suitable for HD video (up to 1080p)
- ⚠️ Limited CPU and RAM → slower encoding, limited high-FPS use
- ⚠️ Not ideal for real-time processing or multiple cameras
Typical use: basic behavioural recording, large multi-arena arrays, IR video without live analysis
Best for: stable, entry-level behavioural experiments
- ✅ Reliable 1080p recording
- ✅ Built-in Wi-Fi and Ethernet
- ⚠️ Limited performance for high-FPS or on-device tracking
Typical use: single-arena experiments, time-triggered recordings, simple automation
Best overall choice for research video recording
- ✅ Much faster CPU and GPU
- ✅ High-quality 1080p recording
- ✅ Handles high frame rates and long recordings reliably
- ✅ Good for multi-camera setups and live preview
- ⚠️ Slightly higher power consumption
Typical use: most behavioural and orientation experiments, IR video, synchronised stimuli, networked RPis
Raspberry Pi 5 (1-16 Gb RAM)
Best for: demanding, future-proof setups
- ✅ Significantly improved CPU and GPU performance
- ✅ Better handling of high-FPS video and real-time processing
- ✅ Ideal for integration with pose estimation or on-device analysis
- ✅ Two camera ports
- ⚠️ Higher cost and power requirements
- ⚠️ Overkill for simple recording tasks
Typical use: high-speed video, real-time tracking, complex automation, long-term unattended experiments
Raspberry Pi Compute Module (CM)
Best for: fully custom, scalable, and embedded video-recording systems
The Raspberry Pi Compute Module (CM) is a board-level version of Raspberry Pi designed for integration into custom hardware. It offers the same processing power as standard Raspberry Pi models (e.g. CM4 ≈ Raspberry Pi 4), but without onboard connectors, allowing full control over system design via a carrier board.
Key advantages for video recording:
- ✅ Same camera performance as Raspberry Pi 4 (CM4)
- ✅ Native support for multiple camera interfaces on custom carrier boards
- ✅ Compact, robust, and ideal for permanent installations
- ✅ Excellent for multi-arena and high-throughput experimental systems
- ✅ Easier synchronisation of cameras, triggers, and external hardware
- ⚠️ Requires a carrier board (off-the-shelf or custom-designed)
- ⚠️ Slightly higher setup complexity than standard Raspberry Pi
Typical use:
Large-scale behavioural platforms, synchronised multi-camera arrays, embedded recording systems, long-term unattended experiments, and custom-built experimental rigs.
2. Power supply
A stable and sufficient power supply is critical for reliable Raspberry Pi–based video recording systems. Inadequate power can lead to dropped frames, camera disconnects, corrupted files, or unexpected system reboots, especially during long or unattended experiments.
Standard Raspberry Pi boards (Pi 3, 4, and 5) are typically powered via a regulated 5 V supply (micro USB for RPi3, type-C for RPi 4 and 5), while Raspberry Pi Zero boards have lower power demands and are well suited for battery-powered or low-energy deployments. For multi-device setups—such as systems controlling illumination, magnetic coils, motors, or valves—it is strongly recommended to separate power supplies for the Raspberry Pi and high-current external hardware to reduce electrical noise and improve system stability.
In field experiments, Raspberry Pi units can be powered using power banks (10000-20000 mAh is ideal for short experiments, we use similar power source for our butterfly flight simulator, for example, Samsung 20000, Xiomi 20000 or 10000), solar panels or high-capacity battery packs, optionally combined with uninterrupted power supplies (UPS) to prevent data loss during power interruptions. For portable or field-based experiments, battery-powered modules offer maximum flexibility. LiPo battery HATs provide compact, rechargeable power with integrated charging circuits and voltage regulation, making them ideal for short- to medium-duration deployments or mobile setups. AA battery modules are a robust alternative where recharging is impractical; they are widely available, easy to replace, and well suited for low-power configurations such as Raspberry Pi Zero or intermittent recording schedules.
Additionally, you can use Power over Ethernet (PoE) which provides a clean and reliable solution for Raspberry Pi systems in laboratory and semi-permanent installations. Using a PoE or PoE+ HAT, both power and network connectivity are delivered through a single Ethernet cable. This reduces cable clutter, improves reliability, and is particularly advantageous for ceiling-mounted cameras, multi-arena rigs, or installations requiring remote reboot and monitoring. PoE is well suited for long-term, unattended experiments where stable power and network access are essential. To power and connect your Raspberry Pi using Power over Ethernet (PoE), install a PoE HAT on the single-board computer and connect it to a PoE-enabled network using a PoE switch or a PoE injector/splitter.
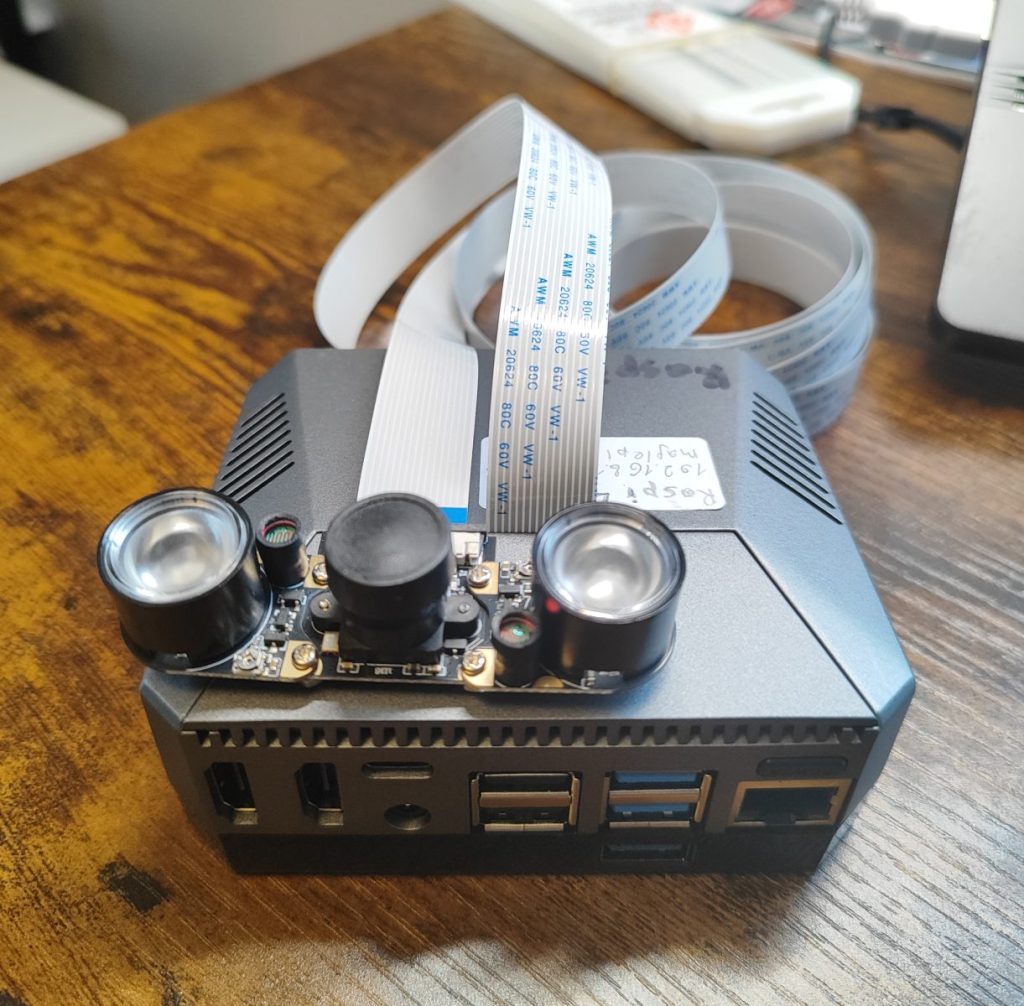
3. Cameras
Raspberry Pi supports a wide range of camera modules suitable for behavioural and orientation experiments (see some camera modules in the table). The standard Camera Module provides reliable high-resolution video for general use, while NoIR cameras (without an infrared filter) enable recording under infrared illumination and in low-light conditions. For applications requiring higher optical quality, interchangeable lenses, or precise focusing, the HQ Camera offers superior image quality and flexibility.
Some camera modules
| Camera / manufacturer | Photo resolution | Video resolution and frame rate | Typical viewing angle (FOV) | Key features | Typical use | Approx. cost |
| Raspberry Pi Camera Module v2 | 3280 × 2464 (8 MP) | 1080p @ 30 fps 720p @ 60 fps | ~62° (H) | Compact, reliable, good low-light | General behavioural recording | £25–30 |
| Raspberry Pi NoIR Camera 2 | 3280 × 2464 (8 MP) | 1080p @ 30 fps 720p @ 60 fps | ~62° (H) | IR sensitive, no IR-cut filter | Nocturnal / IR experiments | £25–35 |
| Raspberry Pi Camera Module v3 | 4608 × 2592 (12 MP) | 1080p @ 50 fps 720p @ 60 fps | ~66° (standard) ~102° (wide) | HDR, autofocus option | Flexible arena sizes | £25–35 |
| Raspberry Pi NoIR Camera 3 | 4608 × 2592 (12 MP) | 1080p @ 50 fps 720p @ 60 fps | ~66° (standard) ~102° (wide) | IR sensitive, no IR-cut filter | Nocturnal / IR experiments | £25–35 |
| Raspberry Pi HQ Camera | 4056 × 3040 (12.3 MP) | 1080p @ 30 fps | Lens-dependent (~15–120°) | Interchangeable C/CS lenses | Optical precision | £50–60 |
| Waveshare cameras | 5–12 MP | 1080p @ 30 fps 720p @ 60 fps | ~45–200° | Wide range of lenses and infrared (IR) LEDs is available | Budget, large arenas, nocturnal/IR experiments | £15–30 |
| Arducam cameras | 8–16 MP | 1080p @ 30–60 fps 720p @ 60–120 fps* | ~20–160° | Many sensors & lenses | Custom optics | £25–60 |
| Innomaker Global Shutter Camera | 1 Mp | 1280×800 (120 fps), 1280×700 (144 fps) 640×400 (309 fps) | Fov(D)=148 degrees, Fov(H)=118 degrees. | Black and white only, high frame rate | For high speed video recording | £25 |
| Arducam 64MP Autofocus Camera | 64 MP (9152 x 6944) | 1080p30,720p60, 640×480p60/90 (RPi mode) | ~72° (H) | High-resolution photo, autofocus | Optical precision | £55–60 |
Camera settings such as resolution, frame rate, exposure, gain, and white balance can be fully controlled via software, allowing optimisation for specific lighting conditions, including infrared, or high-speed recording. Different lenses and optical filters can be used to match field of view and spectral sensitivity to the experimental design. Together, these camera options allow Raspberry Pi–based systems to be tailored to a wide range of laboratory and field recording requirements.
To connect your camera to a Raspberry Pi, use a camera ribbon cable that is compatible with your specific Raspberry Pi board and camera module: RPi Zero (15 cm max), RPi 3 and 4 (15-200 cm), RPi 5 (20-50 cm)
Proper camera mounting is essential for stable, reproducible video recording. Raspberry Pi camera modules are lightweight and can be mounted in a wide variety of ways, from simple fixed holders to fully adjustable mounts. Commercial mounts are widely available, but 3D-printed mounts offer the greatest flexibility and are particularly useful for custom experimental arenas (we often prefer this option). You can find them on Thingiverse, our website or websites of other labs.
Guides:
- How to chose camera for Raspberry Pi (YouTube)
Video recording based on Raspberry Pi: OS configuration
Before starting your first recording, connect your Raspberry Pi to a monitor, connect the camera to the CSI camera slot, insert the SD card with Raspberry Pi OS installed and power it on.
Installing Raspbian OS on a SD card
- Insert a clean micro-SD card with a minimum storage of 64 GB into your computer (minimum for RPi – 8 Gb, ideal 64-128 Gb)
- Download and Install Raspberry Pi Imager on your computer (https://www.raspberrypi.com/software/)
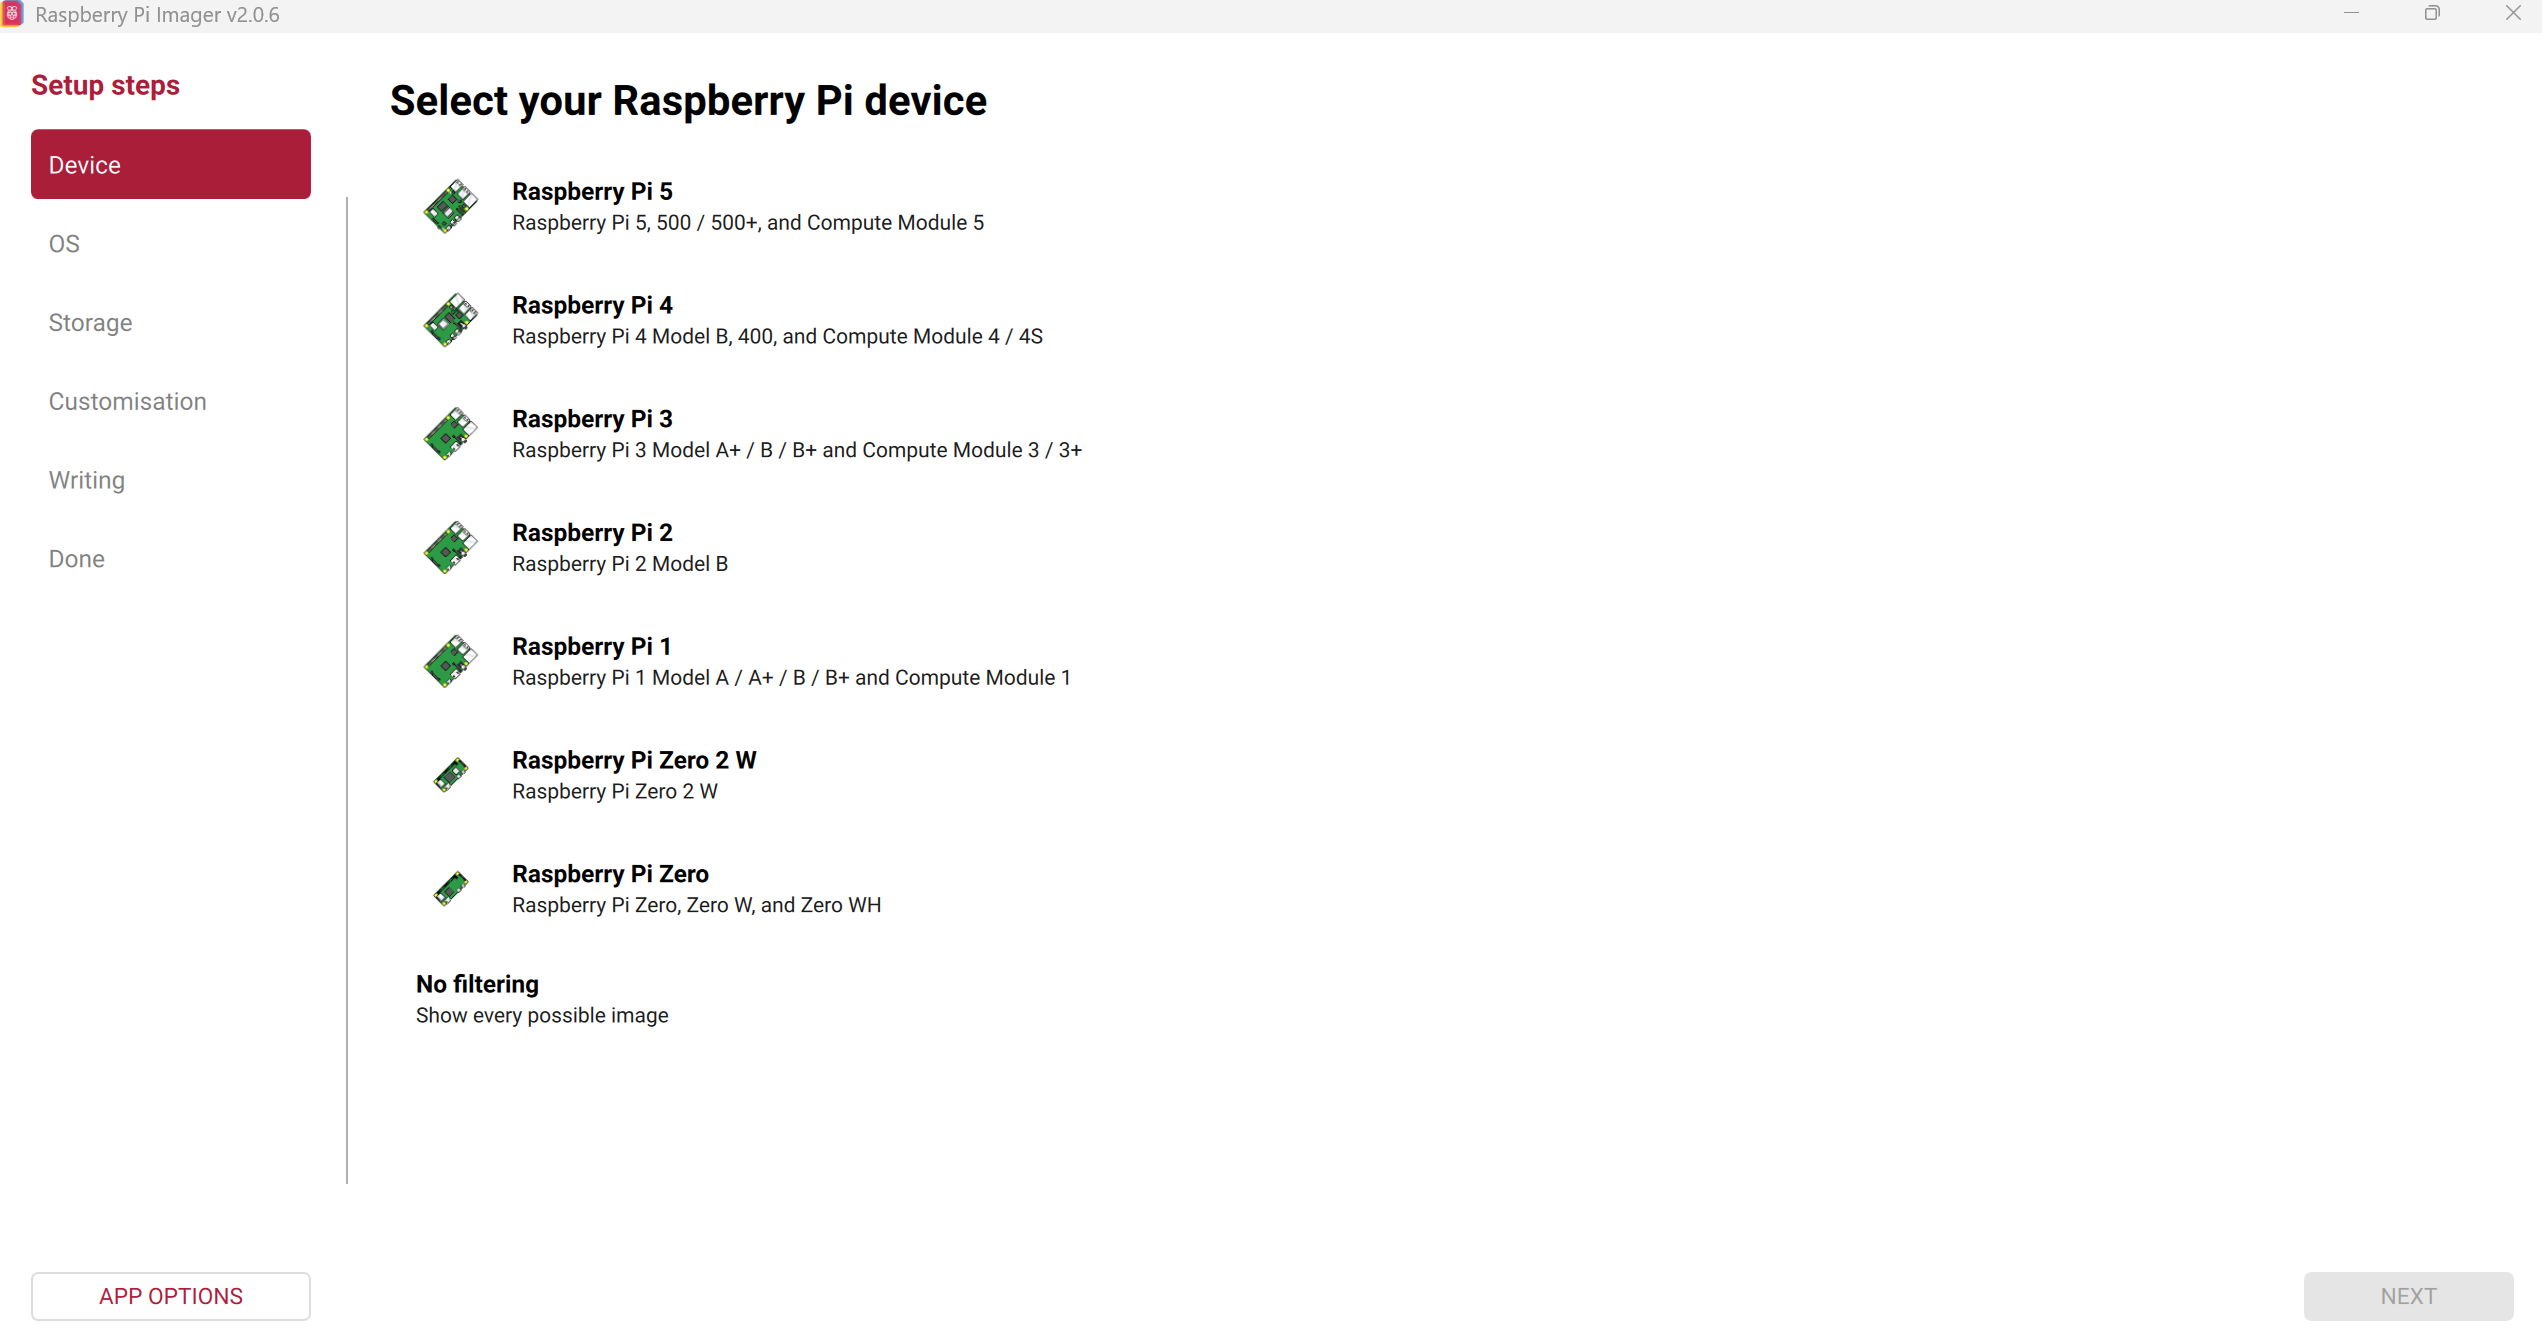
- Open Raspberry Pi Imager and choose your platform (Raspberry Pi 3, 4, or 5; see Figure 1).
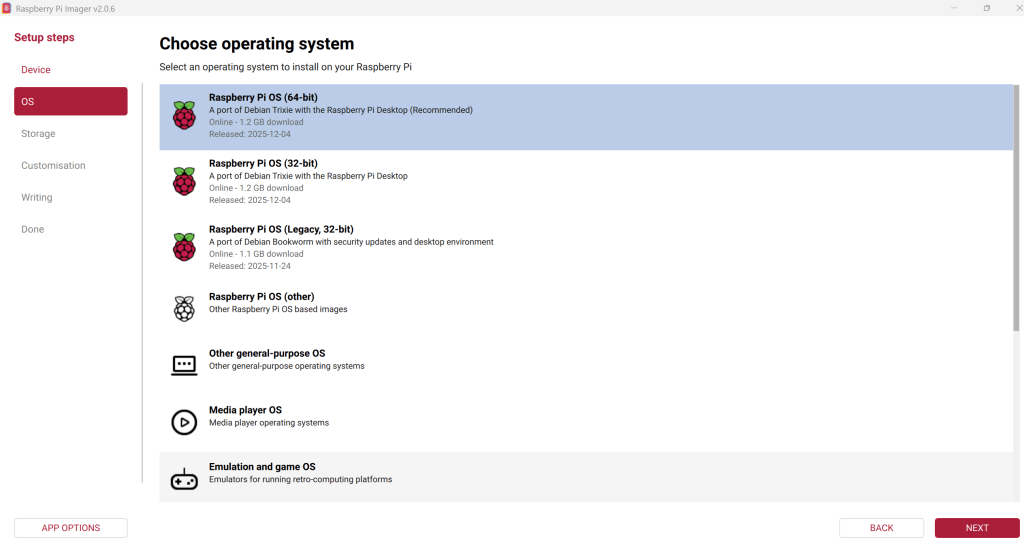
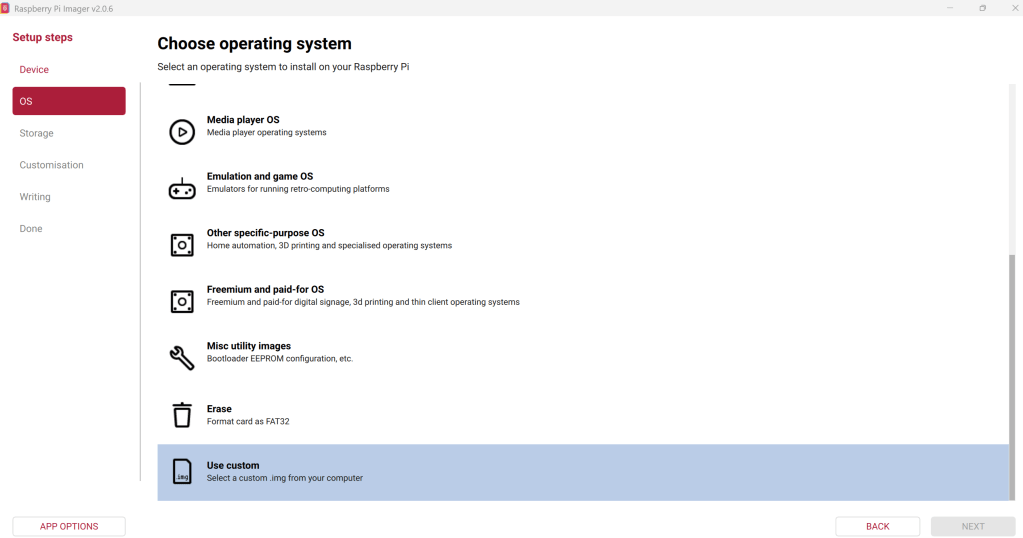
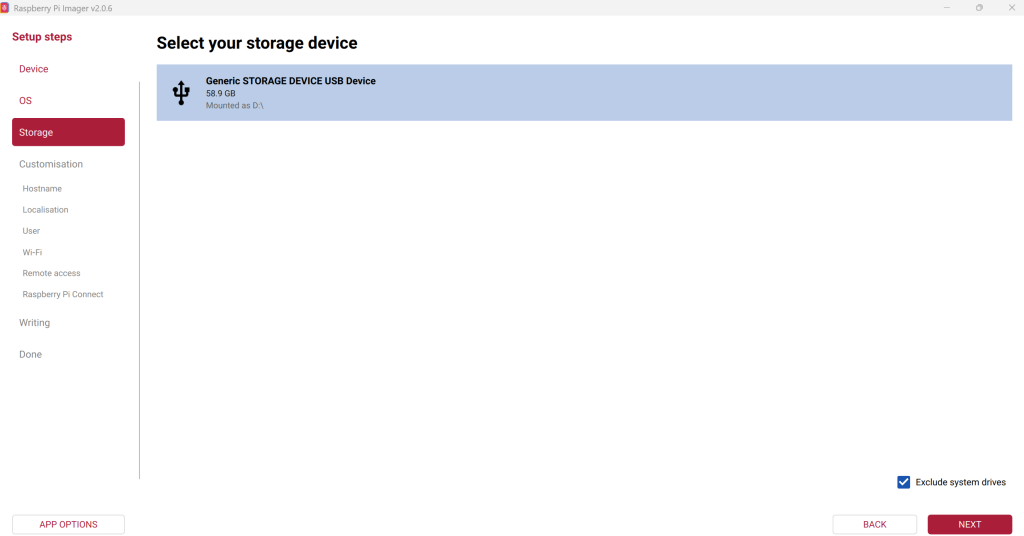
- Then select the operating system (Figure 2) and your storage device (SD card).
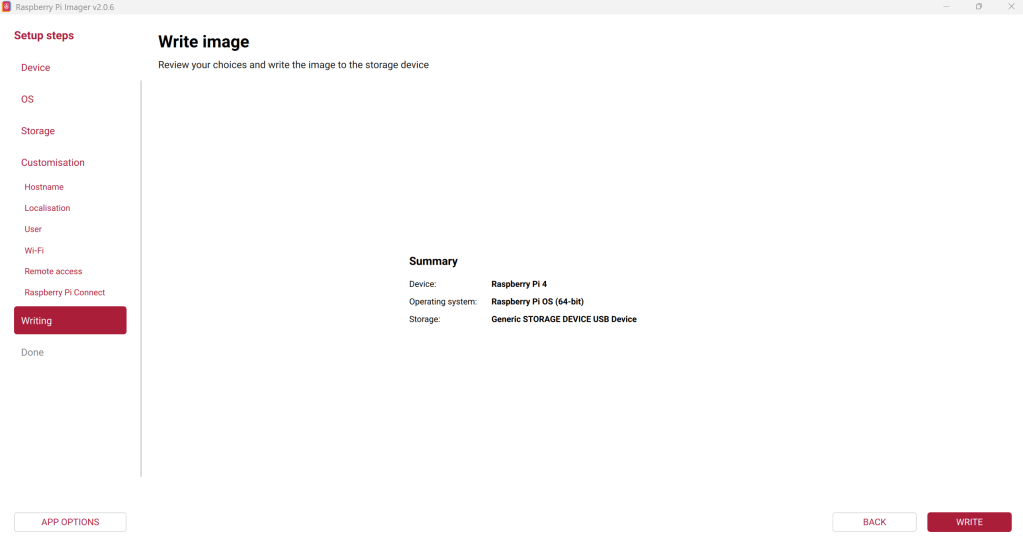
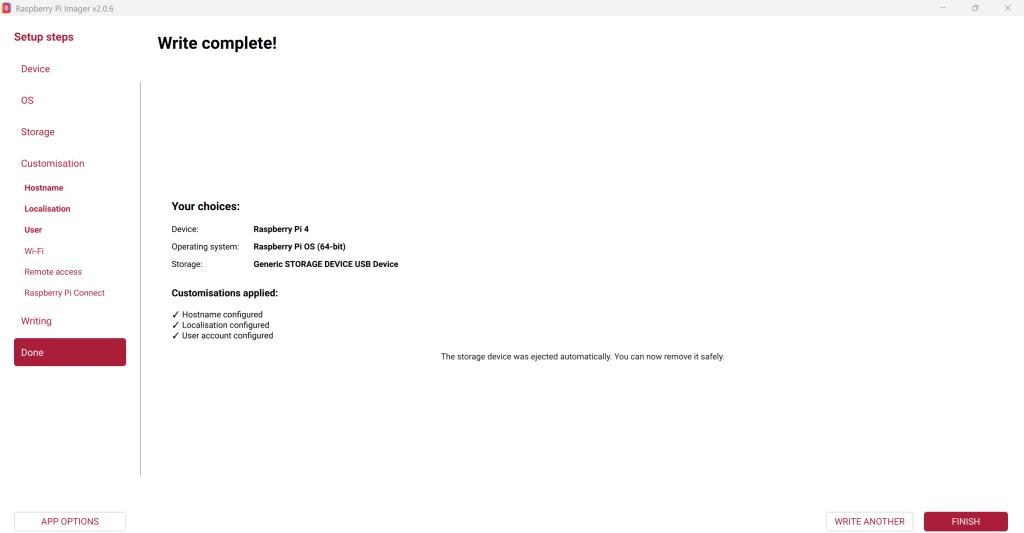
- Customize the settings (hostname, Wi-Fi configuration, login and password, etc.), and write the image to the SD card (figure 4).
- You can select a custom pre-configured Raspberry Pi OS image instead of the official one if you already have a prepared OS image (figure 3)
After the operating system is running, open the Terminal and install the libcamera library, which is used for video recording on the latest versions of Raspberry Pi OS. On older Raspberry Pi OS releases, video recording is performed using raspivid instead.
sudo apt update
sudo apt install libcamera-apps
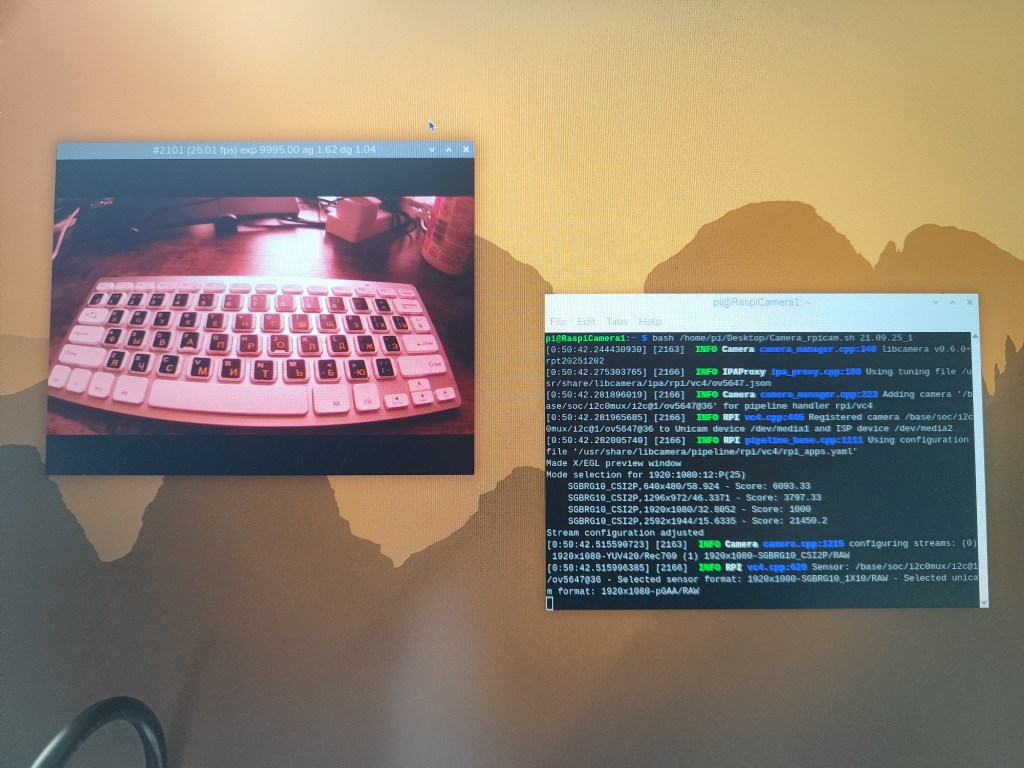
Video recording based on Raspberry Pi: video recording
After installing the required libraries, place this short bash script on the Desktop and run it from the terminal:
bash /home/pi/Desktop/camera_raspicam 21.09.25_1
/home/pi/Desktop/camera_raspicam.sh is the file path to your Bash script located on the Desktop.21.09.25_1 is the name of the recorded video file (for example, using a date_experiment-number naming convention). This script contains the following settings, where you can change the starting filename of the video (magAD) and the video parameters (--width 1920 --height 1080 --framerate 25 -p 0,0,640,480 -t 1800000).
#!/bin/bashSELF_INDEX=magADAdmiral_INDEX=${1:-00}#PORT=${2:-/dev/ttyATMO*}cd $HOME/Desktoprpicam-vid -o $SELF_INDEX._$Admiral_INDEX.h264 --width 1920 --height 1080 --framerate 25 -p 0,0,640,480 -t 1800000--------------------------------------------------------------------------------------------------------------------------rpicam-vid – video recording tool based on the libcamera framework-o $SELF_INDEX._$Admiral_INDEX.h264 – output video file name, generated from script variables--width 1920 --height 1080 – recording resolution (Full HD, 1080p)--framerate 25 – frame rate (25 frames per second)-p 0,0,640,480 – preview window position and size (x, y, width, height)-t 1800000 – recording duration in milliseconds (1,800,000 ms = 30 minutes)
…and voilà — your video recording will start automatically. After the recording ends (-t 1800000 = 30 min), or if you close the video preview window, the video file will be saved on the Desktop.
Video recording based on Raspberry Pi: video analysis
Video conversion: All videos are recorded in the native .h264 format and need to be converted to the more common .mp4 format for further analysis. This can be done, for example, using MP4Box in the Linux terminal or our Python script for Windows.
Video cropping: When the animal is tethered and remains in the same position within the frame, you do not need to analyse the full image. Cropping the video to the area of interest can substantially reduce computational load and can be done using online tools, video-editing applications, or simple Python scripts.
Video recording based on Raspberry Pi: remote access
Raspberry Pi supports several methods for remote access, enabling control of experiments and data retrieval without direct access to a monitor or keyboard:
- Raspberry Connect provides browser-based remote access to the Raspberry Pi desktop via a secure web interface. It allows users to monitor the system, adjust settings, and manage files from any computer with internet access, making it convenient for quick checks and remote maintenance.
- SSH (Secure Shell) provides command-line access for advanced users. It is lightweight, fast, and ideal for running scripts, starting recordings, transferring files, and automating experiments on headless systems, especially in field or unattended deployments.
- VNC (Virtual Network Computing) enables full graphical desktop control of the Raspberry Pi over a local network or the internet. This is particularly useful for configuring cameras, testing recordings, and interacting with software that requires a graphical interface.
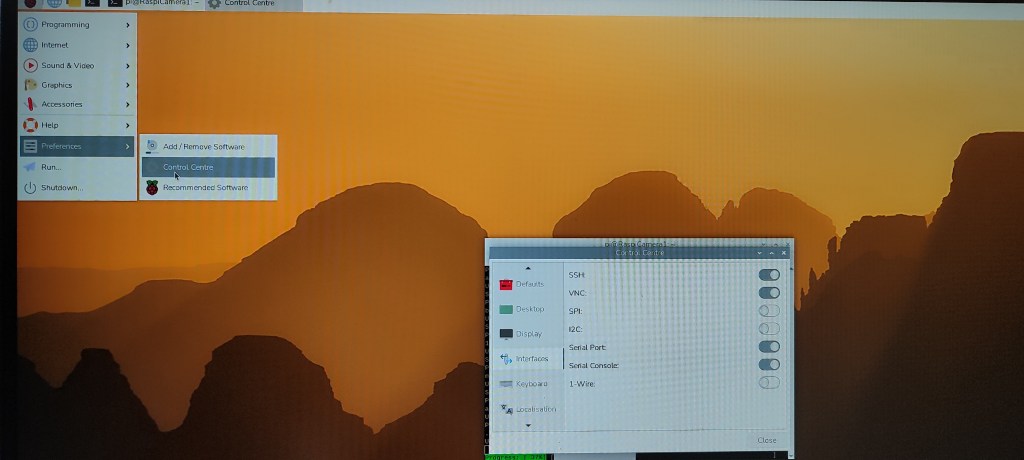
To use SSH or VNC, enable these services in Raspberry Pi Configuration → Interfaces:
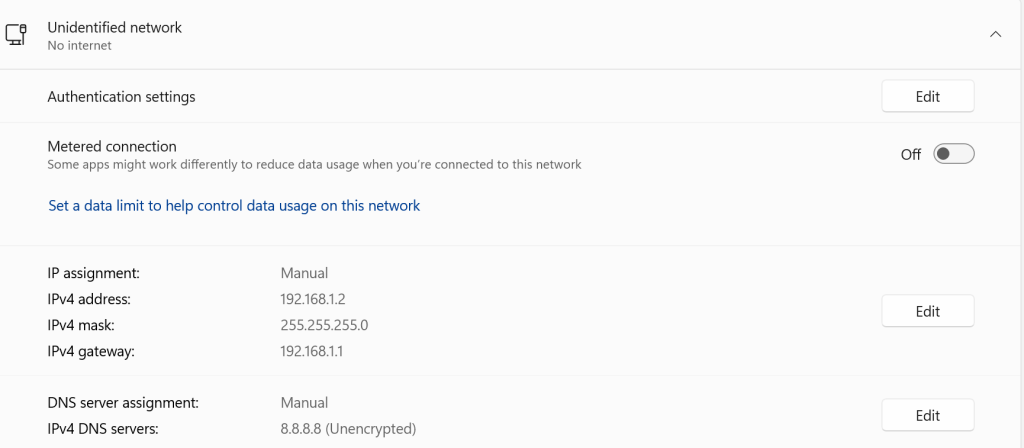
A Raspberry Pi can be connected directly to a laptop or desktop computer using a standard Ethernet cable, without requiring internet access, a router, or a network switch. Modern Ethernet ports support auto-MDI/MDIX, so a special crossover cable is usually not required. This approach works particularly well for behavioural experiments conducted in the field, where there is no internet access and no electricity to power a switch or router.
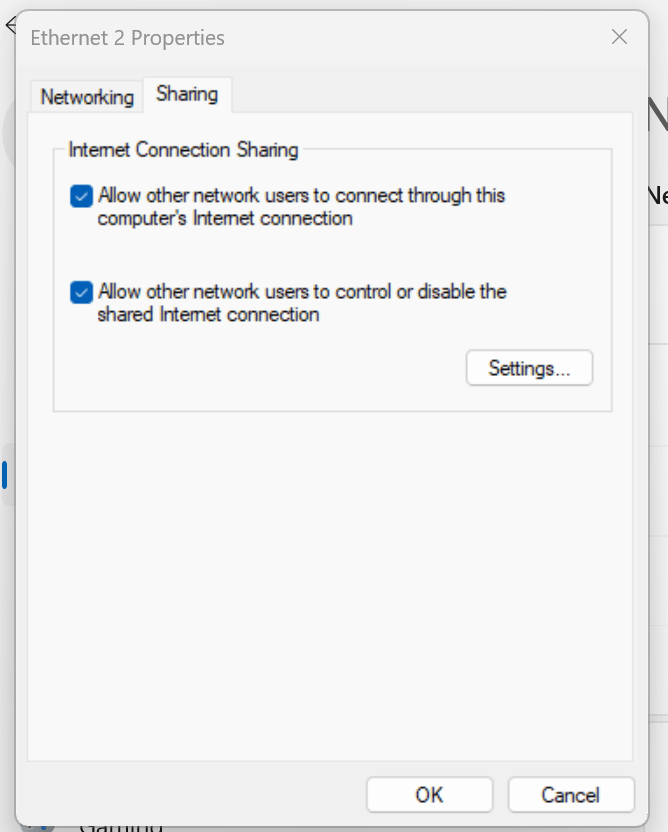
In this setup, you can connect directly to your Raspberry Pi for remote control and video recording. To do this, simply connect the Raspberry Pi to your laptop using an Ethernet cable and create a direct Ethernet connection by assigning static IP addresses on both the Raspberry Pi (Raspberry Pi OS) and your computer (Windows network adapter settings). To enable file transfer, activate file sharing on the Windows Ethernet adapter.

For remote graphical control of the Raspberry Pi, we usually use the RealVNC application. The application can be installed on Windows or Linux systems (or other Raspbian OS). Access to the Raspberry Pi is established using a static IP address, along with the assigned login name and password.
If you need to download files from or upload files to your Raspberry Pi over a local network, we recommend using WinSCP.
Video recording based on Raspberry Pi: main storage
By default, Raspberry Pi systems use a microSD card as the main storage for the operating system, software, and recorded data. For short experiments and moderate video durations, high-quality microSD cards (Class 10 or UHS-I) provide sufficient performance and reliability. We have not experienced any issues with standard mass-market SD cards; however, to be safe, you can use an SD card verified by the Raspberry Pi Foundation and supplied with a pre-installed operating system.
For long-term recordings, high-resolution video, or multi-camera setups, you can use external USB-connected SSDs or flash drives which offer higher write speeds, improved durability, and a lower risk of data corruption compared to SD cards. On Raspberry Pi 4 and 5, external drives can be used both for data storage and, if desired, as the main boot device.
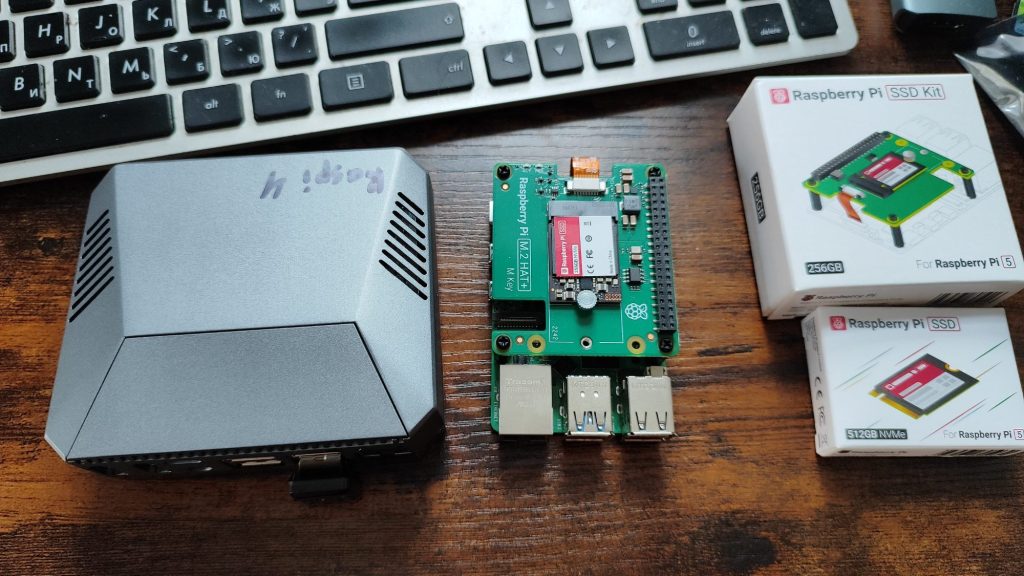
In our experience, an internal M.2 SSD offers the best performance, reliability, and data integrity for video recording experiments. Using an internal M.2 SSD allows the system to boot directly from the SSD, providing significantly higher speed and improved stability compared to an SD card, as well as much larger storage capacity (up to 1 TB).
To set this up, first install Raspberry Pi OS on an SD card. Then connect the SSD using a dedicated M.2 HAT (for Raspberry Pi 5) or an SSD-compatible case (for Raspberry Pi 4). Once connected, transfer the operating system from the SD card to the SSD and configure the Raspberry Pi to boot from the SSD (instructions for Raspberry Pi 5, Raspberry Pi 4)
Video recording based on Raspberry Pi: cases and monitors
Using an appropriate case helps protect the Raspberry Pi and ensures reliable operation during experiments. Cases range from simple plastic enclosures to robust aluminium or metal housings with passive or active cooling. For laboratory and long-term deployments, cases with heat sinks and fans improve thermal stability during continuous video recording. In field or embedded setups, compact and enclosed cases provide mechanical protection and reduce dust and moisture exposure. Specialised cases and HAT-compatible enclosures are available for SSDs, PoE HATs, and other expansion boards.
There is a wide variety of Raspberry Pi cases available in online shops and on 3D-printing platforms such as Thingiverse, which we personally prefer.
There is no need to use an external monitor with a Raspberry Pi if it is controlled remotely via VNC or Raspberry Connect, except during the initial setup immediately after installing the operating system. However, sometimes the Raspberry Pi may not be accessible via remote connections, and you may need to check directly that it is running correctly. In such cases, you can use a variety of monitors (beyond a standard computer display) specifically designed for use with this single-board computer. These are available in different screen sizes, resolutions, and connection types.
Some monitors are small and can be powered directly from the Raspberry Pi. Others require an external power supply. A third type can be powered independently using power banks or from board (with lower brightness), which is particularly useful for field or mobile setups.
Video recording based on Raspberry Pi: conclusion
Raspberry Pi–based video recording systems provide a powerful combination of flexibility, performance, and affordability for behavioural research. The wide range of available boards—from Raspberry Pi Zero to Raspberry Pi 5 and Compute Modules—allows researchers to select hardware that matches their experimental complexity, power constraints, and budget. With support for high-quality cameras, scalable storage options (including SSDs), reliable power solutions, and robust remote access, these systems can be deployed in laboratory, semi-permanent, or fully off-grid field conditions.
Importantly, the open-source nature of both hardware and software ensures transparency, reproducibility, and long-term sustainability. By combining Raspberry Pi platforms with automated recording, remote control, and standardised data formats, researchers can build custom video-recording pipelines that are easily shared, adapted, and scaled across experiments and laboratories.
